Showing posts with label Recipes. Show all posts

Wednesday, April 15, 2020

Ocean Themed Party Cake and Snacks

My son loves anything to do with sea life, so of course I had to have an ocean themed party last year.    I had some fun decorative food for this party I want to share with you all.

Ocean Cookie Cake

First, we had I think my favorite cake I've ever made.  


This post contains affiliate links through which I can earn commission.


The funny part is, this wasn't my original plan.  I was going to make the cookies separately from the cake, but the jumping place we were going to only allowed a cake and fruit and veggie trays.   Anything else cost extra to bring.  

So, I thought...I'll just add the cookies to the cake!

First, of course, I made the cookies with the ocean animals from a larger animal cookie cutter set I'd been given.    You can use your favorite sugar cookie recipe, but we used this eggless sugar cookie recipe I found on a allergy forum.

I made a lot more cookies than I needed for the cake, and only used the best ones.  The rest we saved for after the party.

TIP:  When icing a cookie, add outlines and small detail first, and then fill in around it.  It was something I learned AFTER I did that messy starfish below.


Then I baked my cake (just regular store bought cake mix).   I baked two layers in a square cake pan.  

Make sure the icing on the cookies is totally dry and firm before beginning to ice the outside of the cake (don't touch the icing...just leave it for a long while or chilll it in the fridge and it should be fine).   If you put them on too soon, the icing on your cookies may drip once turned sideways.   You want to chill the cookies before frosting the cake because you want to stick the cookies on right after the frosting goes on the cake.

I used store bought frosting, which I added food coloring to.   You will need A LOT of frosting...so make or buy more than you think you will need).  This particular cake is nice because it's all one color frosting and you don't need to frost it smoothly.  When mixing in the food coloring, it's ok to not mix the blue and white completely.  It actually ads a little "ocean foam" like texture if there are parts with a little white, or a slightly darker blue.     

Frost between each layer and cover the cake generously.    After you have frosted it, use the flat side of a frosting spreader or rubber spatula to dab at the frosting to create the frothy wave affect.   Then smush your cookies of choice into the frosting on the side of your cake, and stick your dolphins straight into the top of the cake. 


Sea Life Snacks


Dolphin Bananas in a Grape Sea


So, I did not come up with this idea...it's something I saw on pinterest and thought was adorable so had to do it.  You can try it with blueberries or jello too.


It's pretty simple.  You cut bananas in half, only using the end with the stem (eat the other ends or save them for something like banana bread).  Slice the stem in half to make a mouth, and put them in a sea of "grapes"  (or in my case a casserole dish pool...can be in clear plastic cups too).  Add eyes with a sharpie.  Put some grapes in the dolphins mouths (some will fall out, but some will stay and that's all you need).


Octopus Pear


This little guy I did come up with on my own, and I'm quite proud of him.  To make him, I cut a pear in half, and then cut two grapes at an angle, stem side up.   I attached the grape eyes with toothpicks.  The legs are slices from a green bell pepper.


Coral Reef


OK, this one I've seen online with veggies, and it looks much cooler the way other people do it (check out this cool veggie reef that was what I was originally intending to duplicate).   But I was running out of time at this point, so I just sliced some celery and added a coral looking piece of ginger into a bowl of strawberries.  The carrots got put on the plate with the octopus and the "cauliflower coral," which I suspected they wouldn't eat anyways, got skipped.


The rest of the party wasn't themed, since we had it at a trampoline place.   But the kids really thought the snacks were cool...and most importantly, the birthday boy loved it!




Tuesday, April 14, 2020

Eggless Sugar Cookies


The following recipe was suggested to me by someone I met at an allergy forum.  They came out great!

_________________________________________________________________

Eggless Sugar Cookie Recipe


Ingredients

1 1/2 Tbsp Water
1 1/2 tbsp vegetable oil
1/2 tsp baking powder
1 3/4 cups all purpose flour
1/2 tsp baking powder (for separate step)
1/2 tsp salt
3/4 cup butter or butter substitute, softened
1/2 cup granulated sugar
1/2 tsp vanilla


Put butter out to soften about an hour before you are ready to bake.

Whisk together the water, vegetable oil, and 1/2 tsp of baking powder in a small bowl.   Set aside.   (This substitutes for an egg).

Whisk together the flour, salt and other 1/2 tsp baking powder in a medium bowl.   Set aside.

Cream together the softened butter and sugar in a large mixing bowl.  (To cream the butter and sugar, cut the butter into small chunks, and then beat it with a long handled spoon until soft.  Then add the sugar to the butter and mash it with the tines of a fork.  Stir the butter and sugar until it is light and fluffy, using a rubber spatula to scrape the sides back into the middle occassionally.   It should end up a yellowish-white color and double the size it was originally.)


To the creamed butter/sugar, stir in the small bowl of oil/water/baking powder you've already mixed together.

Using an electric mixer, mix at low speed while gradually adding dry ingredients, until just combined.   Refrigerate for 1 hour.


Preheat over to 350 degrees, and line several cookie sheets with parchment paper.

Empty dough only a lightly floured surface and knead slightly, and form into a ball.  If the dough seems sticky, knead in more flour, a tablespoon at a time, until it is the right consistancy. 

Roll flat, to about 1/4 inch thick. 

Lightly dust cookie cutters with flour and cut out shapes.  Move the shapes to the parchment-lined cookie sheets.

Put cookie sheets in the over and bake at 350 degrees for 8-10 minutes.

Let cookie sheets cool for a minute or two, then transfer to a wire rack to cook (or if you don't have that, you can lay out on a clean cutting board or on a single layer on plates. 

Once cooled, you can add icing. DO NOT TRY TO ICE COOKIES WHILE WARM! 

I used this eggless royal icing recipe for my eggless icing, and also used some store brand icing which was also eggless.
________________________________________________________________________________


Saturday, August 10, 2019

How to Make Bug Cupcakes


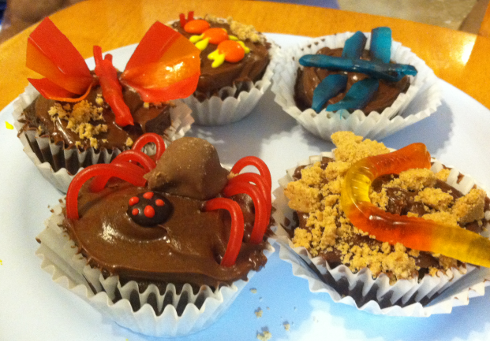
I made the following cupcakes for a bug themed party and it was so fun.   The cupcakes themselves are just regular out of the box cake mix with store bought chocolate frosting, but below you can learn more about how I decorated them.

(DISCLOSURE:   This post contains some Amazon links to some of the more unsual candy used...mostly just cause not everyone would know what it was without seeing a picture even though this is all stuff you can usually find at the supermarket...but I could earn commission from these if you bought something through the link and need to disclose that.). 


THE WORM


To make the dirt I removed the pie crust from a pie tin and broke it up in a plastic baggie, sprinked it on the frosted cupcake, and added a gummie worm.   (You can crumble up graham crackers too...I wanted thicker chunks, and needed the tin for something else anyways, and the pie tins were on sale and actually cheeper than a box of graham crackers, so that's why I went that route.). 


THE BUTTERFLY


I used Fruit by the Foot and Twizzlers Pull and Peel Candy to make the butterfly on this cupcake.   First I cut (with scissors) a roughly 2.5 in segment of fruit by the foot and pinched the middle to make the wings.   I cut two Pull and Peel Strands for antenna and wrapped another length of fruit by the foot around them to make the body, then placed it on top of the wings.   I sort of wish I used a brighter colored icing (like yellow) under the butterfly and dragonfly.   (Note...just learned that Twizzlers has a multicolored version of their Pull and Peel candy, too!   Didn't see that when I was making these!)


THE SPIDER


I used Butterfinger minis (NOT full size) for the abdomen (other candies like Snickers or Milky Way minis could work too...though Butterfinger is particularly rounded).   The legs were made of red vines.   The head is an M&M, and the eyes are made with red writing icing.


THE ANT


The antennas are Twizzlers Pull and Peel Candy (make longer than needed to stick into the cake icing), the body is M&Ms, and the legs are cake icing.   The dirt is crumbled pie crust (see instructions for worm above).


THE DRAGONFLY


The dragonfly is made by first cutting out wings from  Fruit by the Foot, and placing them on the cupcake.  Then I twisted two small segments of Fruit by the Foot to make the antenna, and wrapped more Fruit by the Foot around that to make the body, which was then placed on top of the wings (once again, I think a "flowery" color icing like yellow or pink, or even green for grass, would have looked better under this.)


Friday, May 18, 2018

My Favorite Fruit Salad


My Favorite Fruit Salad

2 small pineapple or one large one.
1 lb (more or less) of strawberries, minus a few to munch on.
1 - 3 Kiwis
(Optional) 1 Banana
(Optional) 1 Orange
(Optional) Raspberries

Start with the strawberries so they have time to create a syrup.  Slice strawberries into pieces (whatever size you like).  Stir roughly with a spoon to start the syruping process.  Chop pineapple into slices or squares.  Remove peel from kiwi and slice (I find the best way to peel a kiwi  is to chop off both rounded ends so you can slice the skin off straight down the sides of the kiwi).  Add kiwi and pineapple.  (You can slice up oranges and bananas too to add.  If I include bananas I always add them last so they don't get too mushy).


Thursday, March 3, 2016

Eggless Cooking: Minty Irish Shortbread Cookies


This will be the first in a series of eggless recipes I've discovered and tried.   I found a recipe over at Feeding Big and added my own twist to it...chocolate mint leaves from my garden!  You could also use any type of mint leave for this, though.  It's a little less sweet than your typical cookie, but light and flakey and fun.

INGREDIENTS
  • 1 cup (2 sticks) Irish unsalted butter, room temperature (regular butter can be substituted, but Irish butter is best because of it's high fat content)
  • 1/2 cup (+2  tablespoon sugar reserved...can use colored sugar for extra effect)
  • 2 1/2 cups all-purpose flour (plus one palmful for work surface)
  • A few sprigs of fresh mint
INSTRUCTIONS
  1. Soften butter on counter (or try these methods).  Remember Irish Butter breaks down quickly because of it's high fat content, so don't take the butter out too soon.
  2. Preheat oven to 300 degrees.
  3. Line two baking sheets with parchment paper and set aside.
  4. In a small bowl add 1/2 cup sugar to the butter and gently mash it into the butter with a fork. With a spoon stir the butter and sugar until they are fluffy and light. 
  5. Slowly add flour while mixing with an electric mixer at low speed. Continue until dough comes together to form a ball.
  6. Chop a small handful of the mint leaves (to taste) and mix into dough, reserving enough whole mint leaves to press one or two into each cookie (I use the bottom leaves for chopping, and reserve the smaller top leaves as they fit on the cookies better).
  7. In your hands, roll small balls of the dough no more than an inch in diameter.  Press a mint leave on the top of the ball and then smash directly onto prepared baking sheet it with a flat instrument (a plate, jar, lid, kitchen mallet, whatever).   Should be about 1/4 of an inch thick.  Space 1 in apart.
  8. Lightly sprinkle reserved sugar  over cookies.  Colored sugar can be used for effect.
  9. Cook at 300 for about 15 to 25 minutes (until cookies just start to turn golden brown).  Cool on wire rack, and enjoy!   (Should be stored in airtight container for no more than 3 days).


FUN IDEAS TO TRY: For a more St. Patrick's Day flair, you could arrange three or four mint leaves to look like a shamrock. Or you could put a real clover on, as they are edible (WARNING THOUGH: Some people are allergic, so you should start with munching on one to see if you're in that group. Also, eating large amounts of clover at once is not suggested because in warm climates they can contain small amounts of cyanide...which is not as scary as it sounds, since cyanide won't hurt you in very small quantities. Clovers that grow in cold climate for some reason don't carry this chemical.)

If you give it a try, please stop by and leave a comment and let me know how it came out. 


Domesblissity