Showing posts with label Cakes. Show all posts

Saturday, September 2, 2023

Bread Pan Train Cakes

For two years in a row, when my oldest son was younger, he asked for a train cake for his birthday.  He STILL remembers these cakes and talks about them.   Read on to learn how I made them. 

A 3D blue steam engine train cake with a cupcake for a smokestack, followed by a yellow coal car filled with crumbled oreos for coal, and oreos for wheels, on top of graham cracker tracks, sitting on a pizza tray covered with birthday paper (multicolor dots) on a table with a blue Thomas the Tank Engine tablecloth.
A train cake, sideways view, with cupcake wheels on a Engine with a double cupcake smokestack, a box car, and a caboose.   There whip cream "smoke"  and it's sitting on two overlapped silver cardboard trays, on top of a blue plastic tablecloth.   There are red decorative details on the Engine.


As you can tell, the frosting is not perfect on either of these.   I'm not a master baker or cake decorator by any stretch of the imagination.  But that means that you don't have to be either to make these cakes!   They don't take a lot of skill...just time and BREAD PANS.


Picture of two bread pans, one larger, and one smaller.


Yep, that's right, these cakes were made using bread pans. The first type only uses a larger bread pan (around 9 X 5"....doesn't have to be exact), and the second also used a smaller bread pan (around 6 X 3"). Both also require cup cake tins.

Now, they will take some time though.    It may take you a couple hours just to frost and decorate these things (never mind the time baking them).  And frosting anything can be tricky...but just know it doesn't have to be perfect.

TIP:  If you add frosting on thick it's easier to fix mistakes and less cake crumbs get into the frosting. 

You don't need a lot of special tools to make these cakes.   I do think a frosting spatula makes things so much more easy, but you can use other tools to spread that frosting.  And while you can use fancy cake piping tools to do some of the details on these cakes, store grocery store bought icing writers or cookie icing will do the trick too.

   
DISCLAIMER:  In the paragraph above, and a few other places on this page, you will find some affiliate links through which I could earn commissions.   Hopefully they are also helpful in defining terms though, too, and wont feel too spammy.


Train Cake 1
 
This is the same picture as the top of the page.  It's the upright 3D blue train engine cake with yellow coal car


For this cake you will need:

  • 1-2 bread pans, around 9 X 5"*
  • One cupcake pan.
  • Baking cups (for cupcakes)
  • 1 Box Cake mix (flavor of your choice)**
  • Oreo cookies
  • Graham Crackers (optional, for tracks)
  • Candy decorations (optional)
  • Food coloring (whatever colors you want for your train)
  • White frosting to color (2-3 tubs)
  • Chocolate Frosting OR black food coloring (if you use chocolate cake mix).
  • Plastic baggy and rolling pin (or something else to smash oreos).
  • Icing writers or cookie icing in color you want for your train window, OR a piping kit (if you prefer to pipe frosting for the window)
  • A frosting spatula (recommended) or knife, for spreading frosting
  • Large mixing bowl, smaller bowls, and something to stir with.
  • A large plate or something else to put the cake on.   Should be at least as wide as a cookie sheet. (I used a pizza pan covered in wrapping paper)

*If you want a super small cake, like for a child's smash cake or something like that, you could use smaller sized bread pans.    This would also make the cake fit on a smaller plate.  You will need to use a mini-cupcake pan if you are doing this with 6 X 3 or similar bread pans.

**The train chimney will be the color of your cake mix.  If you get a white cake mix you can add food coloring to get another color you would like. 


1.  Mix cake mix as directed.

2.  Line cupcake pan with 2-3 cupcake liners and fill half way with cake mix.     Pour mix into bread pans  until they are about 1/3 filled (or do one pan at a time then clean and repeat).  Cook for whatever time is listed for cupcakes on the box.  Test with toothpick to make sure cupcakes and cake is it is done and cook more if needed (you will probably need to cook bread pan cakes quite a bit longer, but it may be less than for other cake sizes listed, so I start checking when the cupcakes are done then check every 5-10 minutes).  You may have extra cake mix, and that's fine.  It can be used if anything goes wrong with the first batch.  

3. Make your frosting if you are doing home-made frosting.  Mix the colors you want for your train in separate bowls or containers (I just bought several .  I used chocolate frosting for under my "coal car" as it blends better with the oreos, but you could also use white frosting and food coloring.

4.  Prep your cake plate.  If you have a "not so pretty" cake plate (such as a cookie sheet), you can line it with birthday paper like I did.  Lay down pieces of graham cracker to make tracks. 

5.  Take cakes out of pans and let cool.  You can take your larger cake and put it directly onto the cake plate on top of the graham cracker tracks, with the curved side facing up (do not trim it).   It should be placed to one side, to leave room for the coal car.  This piece will make up the bottom half of your engine, as shown below.

Train cake 1 with bottom cake section circled in red.

6.  Cut the 2nd bread pan cake it in half.   One half will form the top of the Engine, and the other will form the coal car, as is shown below.


Cake one with the portions circled in red that are made up by the 2nd bread pan cake.


7.   I did not trim the bottom cake before placing the top piece on the engine.  You can see this created a bit of a sloped back affect (like a cartoon train made to look like it was going fast).   If you prefer a straighter look you can cut an l shaped section the size out of the bottom cake to place the top piece into.   Before placing the top piece, frost the top of the bottom cake.   This will help that piece stick and add a tasty layer of frosting. 


8.  Finish frosting the top of the cake.   Just smooth as flat as you can (it can be imperfect and still look cute).  A frosting spatula can help with this (I found it super handy), but you can also just use a butter knife (spread with non serrated side).   You can use Icing writers or cookie icing with the nozzles to draw windows (or you can pipe them out of frosting with piping tools  if you have them, though this can be a bit more challenging).  I placed some candy balloons on ours, and you can decorate it with any type of candy if you would like.  

9.   After the engine is frosted, place an unfrosted cupcake on the top/front to make a smokestack.

10. For my coal car, I cut off a sloped piece to make it look like one side was bigger.  If you prefer it flat you could just trim off the top of the cake to make it flat, or trim one side so that it matches the slope of the other (so that when you add the Oreos it will look like a mound).   Set this on the tracks behind the engine.

11.  Take out 12 Oreo cookies and split them apart.  Set aside the sides with frosting.  Put the sides without frosting in a plastic baggie and roll over it with a rolling pin until the cookies are crumbled into small chunks.  Set aside.

12.  Frost the sides of the coal car with whatever color you would like it to be.   Do not frost the top yet. 

11.  Frost the top of the coal car with either chocholate icing or another dark brown or black colored icing.  Stick the oreo chunks on the frosting to look like coal.

12.  Press the frosted oreos, frosting side in, on the side of the engine and coal car to make wheels.

You now have a completed train cake!


Train Cake 2

This is the same picture as the 2nd picture at the top of the page.  It was the sideways train with one car and one caboose.

For this cake you will need:

  • 1-3 bread pans, around 9 X 5"*
  • 1-2 small bread pans, around 6 X 3"
  • One cupcake pan 
  • Cupcake liners
  • Cake mix (flavor of your choice)*
  • White Frosting to color (3-4 tubs)**  
  • Food coloring (whatever colors you want for your train).
  • Icing writers or cookie icing in black or another color for your train window, OR a piping kit (if you prefer to pipe frosting for the window, which I did).
  • A frosting spatula (recommended) or knife, for spreading frosting*
  • Large mixing bowl, smaller bowls, and something to stir with.
  • 2 Rectangular cake boards (for placing cake on).  

*The train chimney will be the color of your cake mix.  If you get a white cake mix you can add food coloring to get another color you would like. 

**You will need four tubs of frosting IF you plan to frost your cupcake wheels.  I used chocolate frosting to frost mine.    

NOTE:  You can add as many train cars as you like in the middle, but will need to adjust the amount of cake mix and

1.  Mix cake mix as directed.  

2.  Line cupcake pan with 9-12 cupcake liners and fill half way with cake mix (you only need 8 cupcakes, but it doesn't hurt to have a few back up cupcakes).  

3.  Next prep bread pans by buttering and flouring the pans.   You will need 3 cakes from larger bread pans, and two from smaller bread pans.     Pour mix into bread pans until they are roughly 1/3 full.   You may have some leftover mix, which
can be used if anything goes wrong with the first batch.

4.  Cook both bread pans and cupcakes for whatever time is listed for cupcakes on the box.  Test with toothpick to make sure cupcakes and cake are done and cook more if needed (you will probably need to cook bread pan cakes a bit longer, especially the larger ones, but it may be less than for other cake sizes listed, so I start checking when the cupcakes are done then check every 5-10 minutes).

5.   Let cakes and cupcakes cool. 
Add food color to your frosting (one color per tub), and stir well.  Close lids until you are ready to frost.

6.  You may want to take two of the larger cakes and arrange them on the first cake board to make sure they fit (or all three if you manage to find an exceptionally long  cake tray).   I just overlapped my trays.  
You could also cut the back of one board and the front of the other to make the right size, and then just smoosh them together on the table so it looks like one tray  (and if you do this it's even more important to try out the arrangement of your cakes beforehand).  

7.   STEAM ENGINE BASE CONSTRUCTION:
  • Take one of the larger cake pans out and trim the arched side so it is flat.   Lay it horizontally on one side of the cake cake board with the trimmed side down (to make it easier to frost).  You may want to measure it against the size of your smaller cake pan cakes when trimming so they are the same depth.
    (NOTE:   Hey, you may notice that in my final I actually just put the rounded side up in my final cakes.  I can't remember why I did this.  It could be that the bottom of some of my cakes didn't make it out of the pan well.   It could be that I just decided I didn't want to trim stuff.   I'm suggesting this now because it's worked in other different cakes I've made using bread pans, and I think it would have made this look a little nicer, but it didn't look bad as is, so you can skip the trimming if you want). 
  • Next take one of the smaller bread pan cakes, and cut off roughly 1/3 of the cake.   Place it above the larger cake like it is positioned in the picture below (I placed this arch side up in the picture, but bottom side up would probably be more even). 
  • Frost this cake now, before adding the box car behind it.  
  • Lastly, arrange two cupcakes above the front of the larger cake to make a smokestack.  You will need to put a dot of  frosting between the two cupcakes so they stick together, and then press them into the frosting on the bottom cake.

Cake Layout - Engine


TRAIN CAR CONSTRUCTION

7.  Trim your 2nd large cake so one side is flat, and place it behind the first with the trimmed side down.  


CABOOSE CONSTRUCTION

8.  Trim your 3rd large cake so one side is flat.   If working with two boards, overlap or arrange them as you will present them, and then put your cake trimmed side down towards the back of one of the boards, lined up behind the other cakes.  (If you are only working with one board, just line it up behind your other cakes). 

This shows all three cakes in the train cake lined up on two cake boards which are overlapped so they sort of look like one board.

9.   Place the 2nd smaller cake centered above the larger caboose cake/

10.  Add food color to your frosting (one color per tub), and stir well.  Frost your cakes. Add any details you would like (such as windows and decorations, using your preferred tool:    Icing writers or cookie icing  or piping bag.  I used a wide flat piping tip to make the windows and line the roof of the caboose, but you could also do these other ways.
 
11.  If you want, frost your cupcake wheels (optional).  I only frosted the top.   Put a small dollop of frosting on the bottom of the cupcakes and place them beneath the train cars as shown above.   This frosting dot will help attach them to the cake board.

12.   In the first picture of this cake (2nd picture at the top of this page) you can see my "whip cream" smoke.  I do NOT suggest using whip cream for this.  It looks ok there but in a few minutes it was whip cream puddles.  If you do want to make smoke, I suggest doing so with white frosting.   You can experiment with frosting on a paper plate to find your preferred method for making clouds.    


Friday, March 5, 2021

Caterpillar Cupcake Cake

This caterpillar cupcake cake is one of the easiest cakes to make, ever...but totally cute and charming.   Really,  I hardly need to explain it.   You just frost cupcakes in light green, then draw legs and antenna on the plate below them, and draw eyes and a smiling mouth with writing icing.  Even if you totally botch the eyes (as I did...I guess that writing icing was sort of drippy), it can come out cute.   And if it doesn't, its easy to swop in another cupcake for the face and try again.  
It's a "no talent required" cake and I like that.   

While this doesn't feed many, you can do a few of these cakes if you have a larger crowd, or make other bug cupcakes, like the ladybug, or these candy bug cupcakes we did for another party, to fill in.

The ladybug was a touch harder.   I think I let my son do the dots...not sure.   But even done very imperfectly was cute and pretty easy. 


Wednesday, October 21, 2020

Archaeology + Paleontology Layer Cake

Do an archaeological dig through a layer cake.  Great for homeschool history lessons, or archeaology or paleontology parties.  Eat your way through history!

All photos on this page are by Megan Evans


Don't have a yard suitable to doing fun archaeology digs in?   Well, then just try layer cake!

I can't claim to have come up with this brilliant idea.   That honor goes to amazing homeschool mom Megan Evans who made the archaeology/paleontology cake below, and graciously allowed me to share her photos of it here.

She didn't have a yard so she baked "artifacts" into a layer cake to "excavate" later.   That is the tastiest archeology dig I've ever heard of.
 

This shows the top of the cake with green frosting , a toy tent, and campfire scene.

On the top we have a scrumptious campsite.


This shows the layers of the cake.

Then underneath we see the layers.

I like how she made the layers from

different color cake mix.   


In this layer you can see how they made cut outs and placed tiny plastic sun glasses, a fishing rod, and a silver item in the cake.

 
The top layer had some modern items.


This picture shows a skeleton...at it's feet is a ring.


In the middle layer, a grave with grave goods.


(Love the use of the ring as a crown!)


This picture shows the bottom layer of cake with two dinosaurs inserted into cut outs.

And for the bottom layer, moving from

archaeology to paleontology, 

we have dinosaurs.

This is a project that would be so worth the sugar rush.  If you didn't want to eat through all that cake at once I could see gradually "excavating" it over several days.   For older kids you could have them string the top area off like a real archeology dig and diagram where they found things in the cake.  Such fun!   Thanks Megan for sharing this great idea!


TRIVIA  

  • Archaeology and archeology are both correct spellings of the word in the US.   To learn more, read this. ) 
  • Paleontology and Archeology, while they overlap some, are different.  Learn more here.


See More History Posts


Wednesday, April 15, 2020

Ocean Themed Party Cake and Snacks

My son loves anything to do with sea life, so of course I had to have an ocean themed party last year.    I had some fun decorative food for this party I want to share with you all.

Ocean Cookie Cake

First, we had I think my favorite cake I've ever made.  


This post contains affiliate links through which I can earn commission.


The funny part is, this wasn't my original plan.  I was going to make the cookies separately from the cake, but the jumping place we were going to only allowed a cake and fruit and veggie trays.   Anything else cost extra to bring.  

So, I thought...I'll just add the cookies to the cake!

First, of course, I made the cookies with the ocean animals from a larger animal cookie cutter set I'd been given.    You can use your favorite sugar cookie recipe, but we used this eggless sugar cookie recipe I found on a allergy forum.

I made a lot more cookies than I needed for the cake, and only used the best ones.  The rest we saved for after the party.

TIP:  When icing a cookie, add outlines and small detail first, and then fill in around it.  It was something I learned AFTER I did that messy starfish below.


Then I baked my cake (just regular store bought cake mix).   I baked two layers in a square cake pan.  

Make sure the icing on the cookies is totally dry and firm before beginning to ice the outside of the cake (don't touch the icing...just leave it for a long while or chilll it in the fridge and it should be fine).   If you put them on too soon, the icing on your cookies may drip once turned sideways.   You want to chill the cookies before frosting the cake because you want to stick the cookies on right after the frosting goes on the cake.

I used store bought frosting, which I added food coloring to.   You will need A LOT of frosting...so make or buy more than you think you will need).  This particular cake is nice because it's all one color frosting and you don't need to frost it smoothly.  When mixing in the food coloring, it's ok to not mix the blue and white completely.  It actually ads a little "ocean foam" like texture if there are parts with a little white, or a slightly darker blue.     

Frost between each layer and cover the cake generously.    After you have frosted it, use the flat side of a frosting spreader or rubber spatula to dab at the frosting to create the frothy wave affect.   Then smush your cookies of choice into the frosting on the side of your cake, and stick your dolphins straight into the top of the cake. 


Sea Life Snacks


Dolphin Bananas in a Grape Sea


So, I did not come up with this idea...it's something I saw on pinterest and thought was adorable so had to do it.  You can try it with blueberries or jello too.


It's pretty simple.  You cut bananas in half, only using the end with the stem (eat the other ends or save them for something like banana bread).  Slice the stem in half to make a mouth, and put them in a sea of "grapes"  (or in my case a casserole dish pool...can be in clear plastic cups too).  Add eyes with a sharpie.  Put some grapes in the dolphins mouths (some will fall out, but some will stay and that's all you need).


Octopus Pear


This little guy I did come up with on my own, and I'm quite proud of him.  To make him, I cut a pear in half, and then cut two grapes at an angle, stem side up.   I attached the grape eyes with toothpicks.  The legs are slices from a green bell pepper.


Coral Reef


OK, this one I've seen online with veggies, and it looks much cooler the way other people do it (check out this cool veggie reef that was what I was originally intending to duplicate).   But I was running out of time at this point, so I just sliced some celery and added a coral looking piece of ginger into a bowl of strawberries.  The carrots got put on the plate with the octopus and the "cauliflower coral," which I suspected they wouldn't eat anyways, got skipped.


The rest of the party wasn't themed, since we had it at a trampoline place.   But the kids really thought the snacks were cool...and most importantly, the birthday boy loved it!


Saturday, August 10, 2019

How to Make Bug Cupcakes


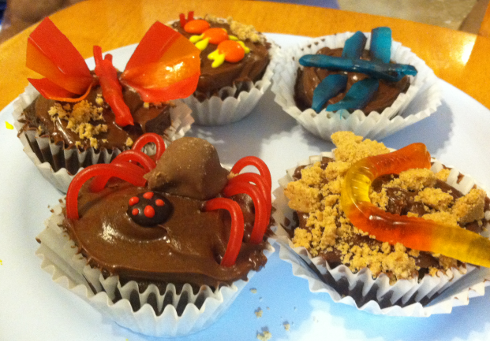
I made the following cupcakes for a bug themed party and it was so fun.   The cupcakes themselves are just regular out of the box cake mix with store bought chocolate frosting, but below you can learn more about how I decorated them.

(DISCLOSURE:   This post contains some Amazon links to some of the more unsual candy used...mostly just cause not everyone would know what it was without seeing a picture even though this is all stuff you can usually find at the supermarket...but I could earn commission from these if you bought something through the link and need to disclose that.). 


THE WORM


To make the dirt I removed the pie crust from a pie tin and broke it up in a plastic baggie, sprinked it on the frosted cupcake, and added a gummie worm.   (You can crumble up graham crackers too...I wanted thicker chunks, and needed the tin for something else anyways, and the pie tins were on sale and actually cheeper than a box of graham crackers, so that's why I went that route.). 


THE BUTTERFLY


I used Fruit by the Foot and Twizzlers Pull and Peel Candy to make the butterfly on this cupcake.   First I cut (with scissors) a roughly 2.5 in segment of fruit by the foot and pinched the middle to make the wings.   I cut two Pull and Peel Strands for antenna and wrapped another length of fruit by the foot around them to make the body, then placed it on top of the wings.   I sort of wish I used a brighter colored icing (like yellow) under the butterfly and dragonfly.   (Note...just learned that Twizzlers has a multicolored version of their Pull and Peel candy, too!   Didn't see that when I was making these!)


THE SPIDER


I used Butterfinger minis (NOT full size) for the abdomen (other candies like Snickers or Milky Way minis could work too...though Butterfinger is particularly rounded).   The legs were made of red vines.   The head is an M&M, and the eyes are made with red writing icing.


THE ANT


The antennas are Twizzlers Pull and Peel Candy (make longer than needed to stick into the cake icing), the body is M&Ms, and the legs are cake icing.   The dirt is crumbled pie crust (see instructions for worm above).


THE DRAGONFLY


The dragonfly is made by first cutting out wings from  Fruit by the Foot, and placing them on the cupcake.  Then I twisted two small segments of Fruit by the Foot to make the antenna, and wrapped more Fruit by the Foot around that to make the body, which was then placed on top of the wings (once again, I think a "flowery" color icing like yellow or pink, or even green for grass, would have looked better under this.)


Friday, January 25, 2019

Ninjago Party

My kids loved Legos for a long time, so lego themed parties became a regular thing at our house.   One of my favorites was the year we did a Ninjago party at the park (which sadly I didn't get a lot of good pictures of, but I still wanted to share it).


The Cake


I did, at least get a good pic of the cake.   This was the 2nd time I'd done this cake...my son liked it so much the first time he asked for it again (only this time the Green Ninja, not the).  The eyes were a little tricky (I used black icing for that)...but the rest was pretty simple.   Just a buttercream with a LOT of green and yellow dye.   I did the eye area first and then spread the other.   The eye area you'll want to really get smooth, but the mask area can be messier and still look cool (in fact, it looks a little bit more like the folds in the mask that way).  It's a very forgiving cake design.


Favors 


This section contain some affiliate links, through which I can earn commission.

The favors boxes were really cool too.  I made them with blue and red Chinese take-out boxes, and had bought Ninjago eye stickers to cut out and put on them, but then lost them somewhere in my house and ended up drawing eyes with sharpies on yellow paper to cut out and use instead.   Above is the ONLY one I could find a picture of, cropped from the background a larger picture  (why, oh why didn't I take picks of these!)


In the box were foam ninja stars and Ninago stickers.   Being foam I felt safe that kids wouldn't hurt anyone if they threw them at someone (which they did).
The ninja stars I got were from target, but I doubt they carry those anymore...so here's some similar ones I found online.

Click on the pictures to see these products on Amazon.


Games

NINJA STAR THROWING
The first game we did was throwing the ninja stars from their favor box (which I gave everyone early), at a couple extra favor boxes.  Pretty simple and the kids liked it (and it gave them something to throw at other than each other).

SEARCH FOR THE GOLDEN WEAPONS
Following the ninja star throwing we had a scavenger hunt to find the Golden sword.   I hid cards around the park with different clues on where to find the next card.  At the end was a cheap plastic sword spray painted gold, and bags of candy for everyone.   They liked the candy but some were a bit disappointed about having to share the sword, so if I were doing this again I would have gotten enough cheap plastic weapons, and let them find one after every couple of cards, making this a search for the "golden weapons" in stead of just one weapon.

The rest of the time, after cake and presents, the kids just played at the park...which is what I love about having a birthday party at the park.  It makes things so simple.


Shared on...