Friday, September 20, 2019

Story of the World Ancient Times - Chapter 13 - Amenhotep and King Tut


The second last half of this chapter of Story of the World deals with the king Amenhotep (later Akhenaten), a Pharaoh who briefly transformed religion and art Egypt, and King Tutankhamun, who during his short reign, changed everything back.    As always, I offer my suggestions for activities and other ways to enhance the reading below.

This post contains some affiliate links through which I can earn commission. 


SUGGESTED BOOK:  ANCIENT EGYPT REVEALED

As you know, I ALWAYS look for pictures from library books or online to illustrate the chapter (cause for my visual learner, one black and white pic isn't enough).   Usually, any kids books related to the subject will have some pictures that would work to illustrate the chapter and it doesn't really matter which one you get...but for this subject this book was SO PERFECT for illustrating that I think it's worth searching for specifically (maybe even doing interlibrary loan for).    It had a really good pictures of Amenhotep...a large statue of him and a wall carving of him and his wife Nefertiti, and more pictures of her on another page (search for Akhenaten, his other name, in the index to find it)  But where it really shines for this chapter is the TWO special lift the flap pages related to King tut (see pictures and/or video below).  


Amenhotep

One interesting thing about Amenhotep/Akhenaten that SOTW doesn't mention is how he changed art in Egypt.   For thousands of years before Akhenaten, and for nearly 1000 years after his reign, Egyptian art remained largely the same.  But for a brief period of about 60 years during his reign and shortly afterwards, the style of artwork in Egypt changed.   This period of time was called the Armana period.  The videos below all share a little something about this...

VIDEO SUGGESTIONS

TICE ART 1010 - Ancient Near Eastern and Ancient Egyptian Art (4 min)
This video is about Ancient Egyptian Art in general (and Mesopotamian art, but I've set the link to start at the Egyptian section), and is done in a cartoon style that would be fun for even young kids to watch.    It only briefly covers the art of the Armana period, but I like it because it shows what Egyptian art was like before and after that period, for contrast.

Armana Period (10 min)
This video covers more about both the religious and  artistic changes during this period.   Sadly it's a little grainy and may not be as fun for younger kids.

Egypt's Armana Period (11 min)
The first half of this video first talks about the discovery of King Tut's Tomb (so would be a great tie-in between the first and last parts of this SOTW section), and from 4:46 on talks about Amenhotep/Akhenaten.   It mostly focuses on the religious changes but gets into the art style change a bit too.  It's a very engaging video.


ILLUSTRATION SUGGESTIONS
Good places to find illustrations to use in the chapter.   


King Tut

ILLUSTRATION SUGGESTIONS
Nearly all children's books on Ancient Egypt will have some illustrations of King Tut.   The original version of SOTW had an illustration of his mask in the chapter, and the Revised has a coloring page of it the activity book.   You can also find beautiful pictures of the mask and other art and statues of King Tut with a quick search online.

But again I want to recommend DK Ancient Egypt Revealed for illustration here. The "lift the flap" pages on Tutankhamen (transparent pages that show part of the picture underneath, and as you lift the page more detail is revealed) were a really dramatic way to illustrate this part of the chapter (as I showed on the video below).   This also shows some cool techniques I have for organizing the illustration pages I use from other books while reading Story of the World.   The video also features the book Make It Work:  Ancient Egypt that had some good illustrations of Tutankhamen's tomb.


ACTIVITY IDEAS

Pharaoh Headress Printable (wearable)

3D Egyptian Death Mask

Make Pharoah's Crock and Flail

Coloring Page (Crowning/Marriage)

Coloring Page (mask) 

How to Draw King Tut


VIDEOS

PBS Special on King Tut (27 minutes)

King Tut's Tomb and Armana Period  (11 minutes)
I mentioned this one earlier but am mentioning it again.  The first half of this video first talks about the discovery of King Tut's Tomband from 4:46 on talks about Amenhotep/Akhenaten.

Ancient Civilizations for Kids -Ancient Egypt
From 1:30 - 5:59 has a really good dramatic retelling of the discovery of King Tut's tomb.   It reminds me of the description in SOTW.


BETWEEN THE CHAPTERS

The Bronze Age Collapse  is a significant event that takes place less than 100 years after King Tut reigned in Egypt.    It's not addressed in SOTW but after this chapter would be a good place to add it in.  Extra Credits History has a good short kid friendly video on it.


Last :: Next

Saturday, August 17, 2019

Bug Party Fun!


Our bug themed party the year my son turned seven was, by far, my favorite party we've had with the kids ever.    Everything worked, yet it still felt simple.   Part of it was due, I know, to a bunch of parents who choose to stay, help where needed, and a group of kids that just got along so well.   But we had some neat games and activities I wanted to share with you all too. 


This post contain some affiliate links through which I can earn a commission. 


THE GAMES


Game 1:  Cocoon Wrap


We had a race to see who could wrap their partner in a toilet paper "cocoon" the fastest.   When everyone was done the kids burst out of their cocoon in a spectacular explosion of toilet paper.   Luckily we had a lot of adults present to help clean up the mess.   (Totally worth the mess, by the way...the bursting out was unplanned and magical)


Game 2:   Fly Catching

Sadly I don't have pictures of this, but there is a great game we found on 100 Days of Play using party blowers to catch "flies" (like a frog would with its tongue).   The kids were giggling all the way through this game...it was so much fun.  
SUPPLIES NEEDED
  • Party blowers (metalic or plastic ones better than paper)
  • Velcro Dots
  • A box (if you are doing this outside)
  • (Optional...printed flies or cut out fly wings...see below)
Attach the soft side of  the Velcro dots to the outside end of the party blowers when they are fully uncurled (soft side because it damages the blower less when it blows in and out).

The flies at 100 Days were made by attaching the other end of the Velcro dots to printed, cut out flies, but since I found black Velcro dots, I cut out little heart shapes in plain white paper and smashed two scratchy side dots together n them so the curved part stuck out the back like fly wings.   You could also just stick two dots together without the wings to save some time.    I suggest making one fly and one blower and testing it out before doing more. 

We put the flies in a box so they wouldn't "fly away" in the wind.   Then we gathered four kids in small groups (3-4 max if you're surrounding a small box...more if you are inside and can spread these out on a table), and had them race to try and catch the most flies with their blowers.  You will want adults around to help them remove the flies from the blowers because it's easy to damage the blowers pulling off the flies.   Paper blowers especially (like we made the mistake of using) can tear too easily while pulling off a Velcro fly.


Game 3:  Centipede Congo Line

You kinda have to have the right crowd of kids and parents to pull this off...and we did.   Parents who really got into it were the key--they got the kids into it.  We basically just walked in a congo line holding onto shoulders...but I told them we were making a giant centipede.   It was simple and fun.   No prep!


THE FOOD


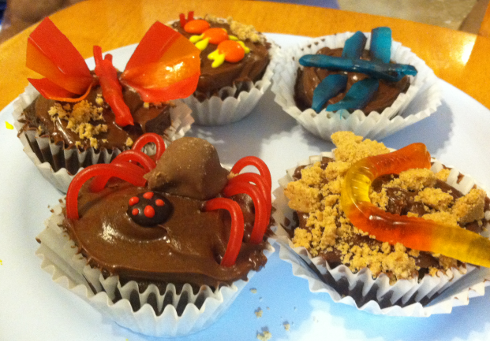
So, originally I was going to make all a mess of cupcakes myself (you can get the details of how to make them here).    But after making these five I realized that this could take all night...and I  suddenly had a brilliant idea!   These cupcakes had been fun to make, even though it was time consuming...and thought how much fun the kids would have DECORATING THEIR OWN CUPCAKES.    So, I brought these for examples, spread out the supplies, then handed the kids a plain cupcake, and plastic knife and a paper plate, and let them decorate their own cupcakes however they wanted.

Did the cupcakes the kids made look anything like the example cakes?   Nope.   Did the kids have a blast making them?   ABSOLUTELY!


And just to have something healthy I also had these caterpillar grapes, 
which a lot of the kids gobbled up!   Originally they were supposed to have 
frosting eyes, but I ran out of time.


We also took off the wrapper on a Sierra Mist and labeled it Bug Juice with a sharpie (like I'd seen on pinterest) .   The kids thought that was HILARIOUS!


Other Fun Buggy Foods

I found these other fun bug themed foods.
We didn't use them for our party, but they sure look fun.

Spiders on a Log (celery snack)


THE PARTY FAVORS


My son's birthday is in April...the perfect time to buy live ladybugs (available at garden centers)....so I thought, why not give away lady bugs in bug jars as a party favor?   They will usually come refrigerated (the cold keeps the docile, and helps them stay alive longer), come with their own bug food.   Be aware that some of them die (and that it's nearly impossible not to get any dead ladybugs into your bug jars), and that they do smell a bit.   Also, if the picture above creeps you out, then I don't suggest this as they look JUST LIKE THAT when you buy ladybugs.   Also, I don't suggest having this as a party favor for indoor parties. 
  1. You can buy bug boxes in bulk online, or make your own with clear cups and press and seal plastic wrap (NOT regular plastic wrap, which comes unstuck too easily).  
  2. I suggest keeping them in the refrigerator until the day before the party so that they both stay alive and stay sluggish (making them easier to redistribute into jars).
  3. Grab a spoon an prepare your jars outside (all lids open), then grab your ladybugs from the fridge, go directly outside, and use a spoon to quickly dish a small amount of them into each of the bug jars.   Then release the rest into your back yard, or put a lid on them, stick them back in the fridge, and take them to the party to release outside there.
  4. Before giving the ladybugs to your party kids, make sure to tell kids to ask their parents if it's ok to take the bugs home (to release in their backyard).  If they want to release the bugs at the party (outside) that's fine too.  
  5. We also printed out a coloring page on the lady bug life cycle we found free on Teachers Pay Teachers.  I can't remember which one, but I like this one with photos (the Ladybugs Grow Up Fast page) and this coloring page here.   The kids were especially facinated to know about the little "alligator" stage of ladybugs, as several had seen those before and not known they were ladybug larve.
Here's a pic of one of the ladybugs that we later released, keeping the aphids off my plants!


Shared on Camera Critters. Quirky Mamma, You're the Star Monday and the Kids Activities Blog

Saturday, August 10, 2019

How to Make Bug Cupcakes


I made the following cupcakes for a bug themed party and it was so fun.   The cupcakes themselves are just regular out of the box cake mix with store bought chocolate frosting, but below you can learn more about how I decorated them.

(DISCLOSURE:   This post contains some Amazon links to some of the more unsual candy used...mostly just cause not everyone would know what it was without seeing a picture even though this is all stuff you can usually find at the supermarket...but I could earn commission from these if you bought something through the link and need to disclose that.). 


THE WORM


To make the dirt I removed the pie crust from a pie tin and broke it up in a plastic baggie, sprinked it on the frosted cupcake, and added a gummie worm.   (You can crumble up graham crackers too...I wanted thicker chunks, and needed the tin for something else anyways, and the pie tins were on sale and actually cheeper than a box of graham crackers, so that's why I went that route.). 


THE BUTTERFLY


I used Fruit by the Foot and Twizzlers Pull and Peel Candy to make the butterfly on this cupcake.   First I cut (with scissors) a roughly 2.5 in segment of fruit by the foot and pinched the middle to make the wings.   I cut two Pull and Peel Strands for antenna and wrapped another length of fruit by the foot around them to make the body, then placed it on top of the wings.   I sort of wish I used a brighter colored icing (like yellow) under the butterfly and dragonfly.   (Note...just learned that Twizzlers has a multicolored version of their Pull and Peel candy, too!   Didn't see that when I was making these!)


THE SPIDER


I used Butterfinger minis (NOT full size) for the abdomen (other candies like Snickers or Milky Way minis could work too...though Butterfinger is particularly rounded).   The legs were made of red vines.   The head is an M&M, and the eyes are made with red writing icing.


THE ANT


The antennas are Twizzlers Pull and Peel Candy (make longer than needed to stick into the cake icing), the body is M&Ms, and the legs are cake icing.   The dirt is crumbled pie crust (see instructions for worm above).


THE DRAGONFLY


The dragonfly is made by first cutting out wings from  Fruit by the Foot, and placing them on the cupcake.  Then I twisted two small segments of Fruit by the Foot to make the antenna, and wrapped more Fruit by the Foot around that to make the body, which was then placed on top of the wings (once again, I think a "flowery" color icing like yellow or pink, or even green for grass, would have looked better under this.)


Wednesday, May 29, 2019

CRAFT: Wrapped Walking Stick


Decorating a walking stick with yarn/and cloth is a fun craft that can be simplified for a young child, yet is still an enjoyable project for a teen or adult to do!  Learn how to make your own below!


This post contain some affiliate links through which I can earn a commission. 


Finding The Perfect Stick
Finding sticks for this craft is easier than you would would think.    You can go to local wooded areas and look for downed branches (sometimes you'll even see downed branches on the side of the road).   Or, look for neighbors pruning their trees and ask if you can take some of the branches.   Once I started looking for sticks for this project, I started noticing them everywhere. 
 
You'll want sticks that are relatively straight, and about 1-2 inches in diameter. Watch out for sticks that are rotten or molded, and make sure to ask if any of the wood had been treated for pesticides (which you will want to avoid.   If any of the bark seems loose, see if you can peel it off as that can be a sign there are bugs underneath.  If you leave on the bark, or are able to peel the bark free, you won't have to sand it.  If you choose to carve off the bark you will want to sand the stick afterwards.  Bark left on may detach on it's own over time.

A good height for a walking stick is about 6-8 inches taller than a person's elbow if their arms are hanging straight down while standing (got that tip from Boy's Life).  Even if you find a stick nearly the exact height you want, you may want to saw one end off to flatten out the bottom of your walking stick.


Wrapping a Walking Stick With Yarn
We decorated our sticks with either yarn or cloth (or both). Below is a video showing a simple way to wrap the stick with yarn. At the beginning of this video I said that I have "a few inches of yarn." I misspoke...I actually had a few feet...but what I meant was that I had a few inches of yarn left over to form a "tail."   You can add beads other charms to the left over yarn tails, as shown in the picture at the top of this page (more on that below).


I love how the yarn looked on this curvy stick.  


When we did these we were looking for simple things we could do with cheep materials.   If you are looking to do something more complex, you can find several more detailed techniques using Paracord (which would also be more weather resistant).  

Turks Head

Cow Hitch

Fish Scale Braid

French Hitching

Solomon V


How to Wrap a Stick With Cloth

You can also wrap a stick with cloth tied in yarn (or leather).  

This is actually a useful feature as it creates a padded area for a hand-hold (the more padding you want, the more layers you will want to wrap around your stick).  We used strips from old t-shirts, but you can use any type of cloth you want (or even scraps of leather).

Wrapping cloth on a stick is fairly simple. First roll a strip of cloth around the stick. Then take a long piece of yarn and tie it tightly near to top of the cloth.  Make your tie in the middle of the yarn so you have two fairly equal lengths of yarn hanging down, and leave about an inch of cloth above where you tie it. For a criss-cross design, spiral one of these down the cloth, and the other in the opposite direction, so that the two lengths of yarn criss-cross, then at the bottom (about an inch from the edge of the fabric), tie these two yarn-tails together tightly.


Adding Decorations

You can add beads or charms to the strings that are left when you are done tying your yarn. You will need beads with a hole large enough that yarn can fit through. I look for beads with holes just slightly larger than the yarn, because then after I've put them on the yarn, all I need to do is tie a double or triple knot in the yarn and that holds on the beads. You can also get charms that tie on the yarn, and those will hold up all the beads above them as well. 

Getting beads onto thick, fuzzy yarn can be tricky! But I have a trick that makes it easy! I use floss threaders (the kind found in the dental aisle of most supermarkets). Just put the yarn through the large hoop of the floss threader, insert the bead over the small pointy end, and then pull the bead down over the yarn. You can see floss threaders in use in the picture below.


I decorated some of the walking sticks with small shells.   Sometimes, while walking on the beach, I find shells with holes naturally worn into them, but you can buy shells buy shells with drilled holes.  Usually these holes are too small to fit yarn through, even with a threader, so I put a small diameter jump ring through the holes and then I can put the yarn through the larger jump ring.


Some Bead and Charm Ideas
(Click to see on Amazon)


Other Decoration Ideas 
And a few practical considerations

You can add lots of other decorations as well. You could use decorative tape, paint, ribbons...whatever you can think of.  You can even carve patterns in your stick if you like to whittle. Skies the limit!

But whatever you do keep practicality in mind. Make sure to leave a smooth surface to hold (or a soft one). Don't put hanging beads and baubles where it will hit your hand as you walk. Be careful of putting paint where you will hold your stick as it might rub off over time (stains might work better). And make sure that whatever you decorate with, it's able to withstand a little weather and wear.


Tips for Group Projects

I originally did this project for our church's Vacation Bible School.   Doing this with a larger group is different than doing it with just your own kids.   You can see my suggestions for doing this project with a large group over at my other blog here (just scroll past the how-to in the beginning, since you've already read that here).


This has been shared on Encouraging Hearts and Home and Littles Learning Link Up.


Saturday, March 23, 2019

CRAFT: Spring Flowers Sun-catcher

This is a craft we did at the Mayborn Museum one spring long ago.  It would be a simple craft to do at home.


To make this suncatcher, or one like it in a different shape, all you need is wax paper, flower petals or leaves (just raid your garden), a pencil, a glue stick,  a hole punch, and a piece of yarn or twine.  You can download shapes to trace off the internet (some are suggested below) or draw your own shape.  Make sure the shape is large!


Draw or trace a shape on one piece of wax paper, and then stack two pieces of wax paper together and cut around your shape. 

Free Shape Templates


 You could cut directly on the line, but if you cut around it helps children to remember to leave an edge around their flower.   Also leave space for 1-2 holes at the top for hanging.

Put glue over the middle area of one of your shapes and put flower petals down on the glue.   Make sure the flower petals don't go all the way to the edge.   Then trace the edges with glue again and put your second sheet of wax paper over the first.   You can press down the whole sheet to press the flower petals or just press the edges together to leave the petals a little loose (like my son did).    Once it dries punch your hole (you can punch it before the glue dried but the glue may gunk up your hole punch).  


Sunday, February 24, 2019

First Year Homeschool Memories: Snow in Texas


One of the things I loved about homeschooling was the rare fleeting moments we would get when everyone else was in school.   Like enjoying a brief Texas snow flurry.

Snow is rare in Texas, so even the smallest dusting is a treat.   That morning we headed out as soon as the snowflakes began to fall.   There was a little koi pond at a gardening store at the end of our block...and we walked out to it.  My son wanted to know if fishes get cold.  I'm sure they do...they were all huddled up on the bottom in one corner of the pond...and didn't come up to the top to greet us like they usually do.


My other two were in school when the snow hit.  After we finished our walk out in the white stuff, I hemmed and hawed about whether to go get them out of school.  I finally looked at the weather and it said it would get warmer later so I got my youngest re-bundled and got in the car.

It was still snowing when we left, but half way to their school it started to rain. Alas, no point in them missing a day to play in slush, so we turned around.

My older two later told me they did get a few minutes out in the snow.  At the intermediate school the whole school got to go outside for 10 minutes (not much, but at least it was something).  The elementary school stayed inside for recess (Ptttth!  Come on!  Let them play in it!  But, maybe it was turning to rain by then.).  However,  during library time the kids were taking pictures through the window, and the librarian had pity on them and let them go outside for a few minutes to take pictures of the snow with their ipads.   Yeah for librarians!   But honestly, with how infrequently we got snow back in Texas, I'm surprised the teachers didn't jump on the change to let the kids experience it.    I was sorry my older kids didn't get to do more than that.   But it made me so thankful that at least my youngest home for it. 


Shared on Throwback Thursday

Thursday, February 21, 2019

A Change of Paths...and What's Ahead for Imaginative Homeschool


I have a big announcement to make.    After four years of homeschooling my youngest (my only homeschooler), we made the the difficult decision to try public school again. We have LOVED homeschooling, but for various reasons this was the right decision for us . 

I didn't announce it right away because we weren't sure how it was going to go, and I had so much emotional  baggage to sort through.  I wasn't even sure if he would stay or be back homeschooling in a few months, but he's happy and doing well so it looks like we're sticking with this. 

This is NOT the end of homeschool content on this blog!    To start with, I have the rest of our Story of the World chapters to blog about (I've only blogged to chapter 13 but we are FINISHED with Volume 1 and half way through Volume 2.)   That's about 50 posts right there alone.  And I have notes on A BUNCH of other things we did while homeschooling that I plan to finally get around to blogging about.   I have resources for All About Spelling and Math U See I never posted, lots of arts and crafts I'll be sharing, and more tricks and tips on a variety of subjects.   I will keep the name "Imaginative Homeschool" for now, as it still describes a lot of what I'll be blogging about.   You'll notice though that I've adding "+ afterschooling and summer-school" to the blog header because that describes the part of our journey we're on now, which I plan to blog about too!

Our summer-schooling will be a lot like our homeschooling was during the year (only maybe just 3 days a week).   My kiddo needs it to prevent summer slide, plus there's so much interest based stuff that we wanted to do and haven't done yet.  

I also think its important to blog about our experience going back to "traditional school" after homeschooling, because in some ways that's as difficult a leap as starting homeschooling can be, and a very different experience from sending kids to school who have never homeschooled.  And while there's lots of guidance out there for new homeschoolers, there's a lot less for homeschoolers returning to traditional school, and I want to help others going through the same thing...or at least share my experience so they can feel like they're not alone. 

Wherever you are on your journey, I hope you'll stick with us for the rest of ours.

With Love,
Gale


Wednesday, February 20, 2019

Easy Science Experiement: Milk + Dyes + Soap


This is a science experiment I did with my kids AGES ago...when my kids were so much smaller.   I loved how ARTSY this science experiment was.

It's fun and fairly simple. You will need:
  • A shallow pan or bowl
  • Milk
  • Food coloring
  • Dish soap
Fill the pan with milk. Drop several drops of different colored food coloring in different places in the milk. Then, squirt a small drop of dish soap in the middle of the dish soap. The colors will start to swirl as the dish soap reacts to the protein in the milk.  Like this...


Isn't that cool!  Of course, if you want to keep this "artwork" to hang on your wall then you'll have to take some pictures like we did.  I love how this also caught the reflection of the lights above our table.  Pretty cool!

LESSON IN COLORS
Use red, yellow, and blue food coloring to help teach younger children what colors are created when those colors mix.

EXPLORING DIFFERENT TYPE OF MILK
The blogger from Tots and Me commented that she tried this experiment with milk with different fat contents (1%, 2%, Whole, etc.) and that it does change the reaction.

THE SCIENCE BEHIND IT
I found this description of what causes the colors to swirl on About.com:
"The detergent lowers the surface tension of the liquid so that the food coloring is free to flow throughout the milk. The detergent reacts with the protein in the milk, altering the shape of those molecules and setting them in motion."
So, what is "surface tension?"   You can learn more about it and do an easy experiment to find out here.

You can read an even more detailed description at the bottom of About.com's Magic Colored Milk Science Project Page.


FOLLOW UP

You can follow up/review this info while cleaning. When cleaning a greasy pan have children observe what happens to the grease when you fill a pan with water and then add a drop of dish soap (the grease will go to the edge of the pan). Talk about how that's the same thing that happened when we did the milk experiment.   Talk about how soap works to help get rid of grease.  


Shared on Little's Learning Link-up, Throwback Thursday

Wednesday, February 6, 2019

Modern Slavery: Free Resources

SLAVERY STILL EXISTS


Did you know that there are MILLIONS of people still in slavery...TODAY?   Many people think that slavery ended with the civil war, but the Emancipation Proclamation only ended LEGAL slavery in the United States.   Slavery continued in many places legally for long after that, and continues as a criminal activity even today.
"I want to be very clear:  I'm talking about real slavery.  This is not about lousy marriages, this is not about jobs that suck, this is about people who can not walk away, people who are forced to work without pay, people who are operating 24/7 under a threat of violence, and have no pay.  It's real slavery in exactly the same way that slavery would be recognized throughout all of human history."
           - Kevin Bales (from his TED Talk in 2010.)
Slavery today looks a lot like slavery a few hundred years ago (though there are some differences).  Read on...

WARNING:   The chart below contains some information that may not be appropriate for younger children, and may contain triggers for abuse victims.   The printable of this chart contains versions with and without more mature content, so that some of the information about modern slavery can be more easily shared with elementary age children.   You have permission to copy and edit this material even further to make it more appropriate and accessible for you own children or classroom, if necessary.


Past and Present Slavery
A Side by Side Comparison 

Then Now
For most of history, in most places, slavery was legal. (1b, 1c) Today, slavery is officially illegal around the world, though laws against slavery are not always enforced, and some countries lack laws covering some forms of slavery.  Still, slavery as a criminal activity exists worldwide. (1c, 2)
The average cost to buy an enslaved person was around $12,000 to $40,000 (adjusted to today's currency), and because of this they tended to be treated as a long term investment (1d, 2)The average cost for traffickers to obtain an enslaved person, worldwide, today is somewhere between $90 - $400.  In North America, the cost is around $3,000 to $8,000--still a fraction of what it cost when slavery was legal here.  The result of this is that today's slaves are often treated like disposable resources. (2)
Slaves were subject to beatings and other forms of violence and abuse. (1d) Beatings and other forms of  violence are still tools traffickers use to keep people enslaved today. (2)
Enslaved women were often raped by their masters and subjected to other sexual exploitation. (1d) Women in slavery today are still subject to rape, even when they are trafficked primarily for labor, not sex. (2)
Tattoos were used to mark people as slaves in ancient China, Greece and Rome, and branding was common during the trans-Atlantic slave trade. In both ancient Rome and in the U.S. south, metal collars were sometimes put on slaves who tried to run away. (1d, 1e, 1f, 1g, 4)Today, sex traffickers sometimes tattoo their victims so that they can mark prostitutes as "theirs" and track them down if they try to leave. These tattoos may be names or designs like logos, and often  incorporate bar codes that can be scanned by smart phones.  In Niger, Wahaya slaves are sometimes made to wear heavy brass ankle bracelets to signify their slave status.  (5,6, 7a, 7b)
In the past, slavery was an important part of world economies, and a large percentage of many nations were slaves.  Here is a sampling of nations who's approximate historical slave prevalence we know (numbers are rounded).

Percentage of 
Population Enslaved
(by Year Recorded)

150 BC - Rome - 30-40%
1086 - England - 10%
1860 - U.S.A - 13%
1910 - Korea - 30% to 50%
1930 - Ethiopia - 12% to 25%


(1b,1g)


The percentage of the world population enslaved today is lower than at any time in modern history, and the money generated by slavery today is the "tiniest proportion of the global economy to ever be represented by slave labor." (2)   The exact percentage of slaves in the world today is impossible to  determine as slavery today is  mostly a criminal, underground activity, and no longer publicly recorded as it often was under legal slavery.  But the largest  slave population in the world today is most likely Mauritania, where an estimated 4% of the population is still enslaved.   We are closer to ending slavery than ever before. (2, 8, 9)      


Sources listed at the bottom of this page.

"The past, the present, and the future are really one:  They are today"
~Harriet Beecher Stowe, 18th Century Abolitionist


Free Modern Slavery 
Educational Resources 

I believe it is just as important to teach our kids about modern slavery as it is to teach them about historic slavery.   Here are some free resources you can use to teach your children or students about slavery.

Printable Then and Now Comparison Chart
I have two versions of this chart, one simplified for elementary age children (without the information about sex trafficking and rape), and a version for older students similar to the one above.  The version for older students also contains sources, so that they can look up more information on any item if they choose.

Teacher Resource by Free the Slaves
 Several pages of concise info about modern slavery.   There are no graphic details, but sex trafficking and prostitution are mentioned.

Global Slavery Index Infographic
This contains a lot of information about modern slavery in a helpful graphic.


SOURCES:
1.  Wikipedia: 
1b. Slavery
1c. Abolition of Slavery Timeline
1d. Treatment_of_slaves_in_the_United_States
1e. Human Branding
1f. History of Tattooing
1g. Slavery in Ancient Rome
1e. 1860 US Census
2.  How to Combat Modern Slavery, 2010 TED Talk by Kevin Bales (Transcript)
3. Sexual Violence in Labor Trafficking
4.  Object Record:  Slave Collar
5.  Tattood Trafficking Survivors Reclaiming Their Past - The Guardian
6. The Ink 180 Story
7.  Anti Slavery.org
7a. Descent Based Slavery
7b. Wahaya:  Young Girls Sold Into Slavery
8.  Global Slavery Index - 2014 Report
9.  "The Global Markets in Modern Day Slavery" by Gary Craig Criminal Justice Matters, Volume 97, Issue 1, 2014
10 "Twenty First Century Slaves:  Combating Global Sex Trafficking" by Siddharth Kara


SHARED ON....

Throwback Thursday


Saturday, February 2, 2019

Magnet Letter Phonics


A fun an easy way to practice phonics is to let your child make up words with magnet letters.    Whatever order they put the letters in, you sound out the "word" they made.   If they make a word with no vowels, point out that you can't say a word without vowels, point out what the vowels are, and have them add some until the word is more readable.  If you have color coded magnet tiles where the vowels are a different color (like those that come with several phonics programs, such as All About Reading and Barton) it's even easier to reinforce this idea using those. 

My kids loved playing this game, and it really helped them associate the sounds with the letters and learn about how to sound out words.


Shared on


Friday, January 25, 2019

Ninjago Party

My kids loved Legos for a long time, so lego themed parties became a regular thing at our house.   One of my favorites was the year we did a Ninjago party at the park (which sadly I didn't get a lot of good pictures of, but I still wanted to share it).


The Cake


I did, at least get a good pic of the cake.   This was the 2nd time I'd done this cake...my son liked it so much the first time he asked for it again (only this time the Green Ninja, not the).  The eyes were a little tricky (I used black icing for that)...but the rest was pretty simple.   Just a buttercream with a LOT of green and yellow dye.   I did the eye area first and then spread the other.   The eye area you'll want to really get smooth, but the mask area can be messier and still look cool (in fact, it looks a little bit more like the folds in the mask that way).  It's a very forgiving cake design.


Favors 


This section contain some affiliate links, through which I can earn commission.

The favors boxes were really cool too.  I made them with blue and red Chinese take-out boxes, and had bought Ninjago eye stickers to cut out and put on them, but then lost them somewhere in my house and ended up drawing eyes with sharpies on yellow paper to cut out and use instead.   Above is the ONLY one I could find a picture of, cropped from the background a larger picture  (why, oh why didn't I take picks of these!)


In the box were foam ninja stars and Ninago stickers.   Being foam I felt safe that kids wouldn't hurt anyone if they threw them at someone (which they did).
The ninja stars I got were from target, but I doubt they carry those anymore...so here's some similar ones I found online.

Click on the pictures to see these products on Amazon.


Games

NINJA STAR THROWING
The first game we did was throwing the ninja stars from their favor box (which I gave everyone early), at a couple extra favor boxes.  Pretty simple and the kids liked it (and it gave them something to throw at other than each other).

SEARCH FOR THE GOLDEN WEAPONS
Following the ninja star throwing we had a scavenger hunt to find the Golden sword.   I hid cards around the park with different clues on where to find the next card.  At the end was a cheap plastic sword spray painted gold, and bags of candy for everyone.   They liked the candy but some were a bit disappointed about having to share the sword, so if I were doing this again I would have gotten enough cheap plastic weapons, and let them find one after every couple of cards, making this a search for the "golden weapons" in stead of just one weapon.

The rest of the time, after cake and presents, the kids just played at the park...which is what I love about having a birthday party at the park.  It makes things so simple.


Shared on...

Saturday, January 12, 2019

Book Review (+Free Printable): 100 Scientists Who Made History


This post contains some affiliate links through which I can earn commission.

One of the great things about homeschooling is getting to make connections between different subjects.   As we study history, I wanted my son to learn about the great scientists of the past...but I wanted to do it in a light, fun way.  100 Scientists Who Made History with it's fun, useful visuals and brief, interesting descriptions of the life and contributions of scientists throughout history, was exactly what I was looking for (or nearly that...I'll explain why later).

The book contains a wide array of scientists from various cultures from ancient through modern times.   Fifty-five of these (yes, I counted) are given full page features, brimming with fun facts about their life and work.   


 The rest of the 100 scientists are given brief paragraphs on pages like these...


So, why was it only NEARLY what I was looking for?   Well, because ideally, the scientists would be arranged in chronological order, making it easier for me to supplement my history lessons.   This book, though, was arranged by topic (a perfectly reasonable and useful way to arrange a book of this sort, but it didn't work well for my purposes).    To fix that, I made a chronological list of the scientists featured in the book,  which you can grab at the link below....


Quick Organizing Tip


When I have a book like this that I want to be used for my history lessons, I will mark the pages I want to use for the next era/section with post-it-notes marked with either the date or chapter.   I also keep a notepad on my computer, organized by chapter, where I list resources I want to use in the future.   I'll stick post-it's in my spine in chapters I have extra resources for, reminding me to check that list. 

For more ways to combine science and history,